

Most applications include features to add, view, edit, and delete data. These four basic operations -Create, Read, Update, and Delete- are collectively known as CRUD. and although normally simple to implement, they also tend to be boring and boilerplate in every programming language.
Rails says: Hold my beer!
In the previous section… Our First Rails Application
- By the end of today, you’ll see just how easy it is to create a CRUD feature.
- Also, how to create data references/relationships.
- How to implement validations.
- And finally, an easy way to seed data into the application database.
Implementing a CRUD feature
The core mission of our Railsdex app is to store details about every Pokémon a trainer encounters on their adventure. So, let’s implement a feature to manage Pokémon details. As the starting point, the application must provide to the trainer -or user, the ability to add a Pokémon entering its name, describing what the little monster looks like, and confirming its capture.

The mighty Rails makes implementing CRUD features incredibly simple. Introducing to scaffold command.
Open a terminal in your project directory and run:rails generate scaffold Pokemon name:string description:text captured:boolean
As usual, Rails will start generating all the files and changes needed to have the feature implemented. The controller, model, views, and routes needed to make it all work are generated in one go by Rails: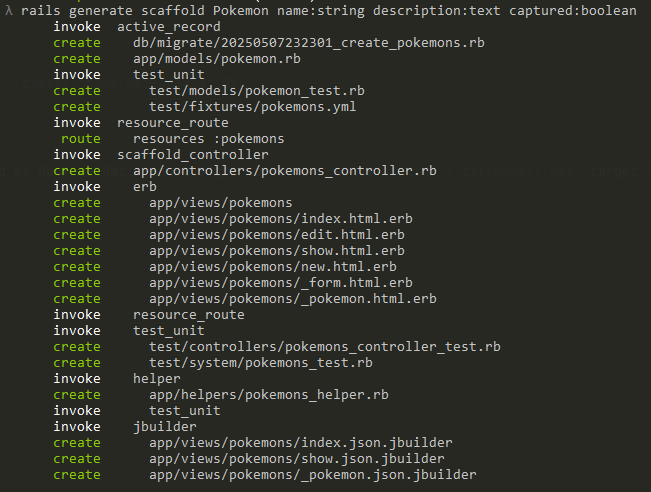
In the blink of an eye, Rails generates the following structure for your new feature: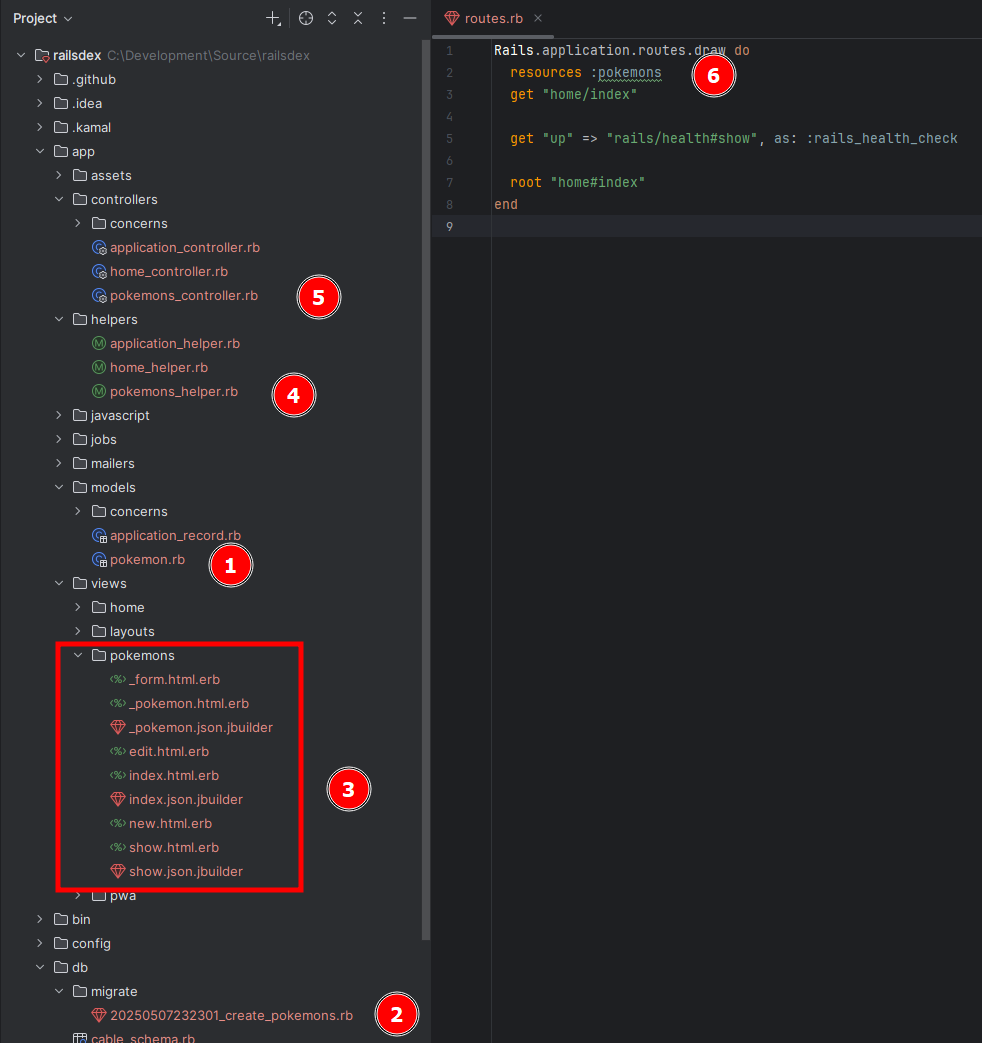
- Model class that represents the Pokémon table in the object-relational mapping.
- Migration class responsible for creating the table in the database.
- View templates for user interaction with Pokémon data.
- Helper module used by views.
- Controller class that provides all operations with Pokémon data.
- Routes entry boxing the flow between views and controller.
Interested in knowing more about
rails generate scaffold? Check this out
Feel free to open any of those files and explore how the code accomplish its duty. It’s worth paying special attention to the migration and controller files.
The migration file updates the database structure to support the new feature. And as any other migration created during the development of the application, we need to ask Rails to apply it. So, using the same command prompt type:rails db:migrate
Once the migration is applied, you’ll see Rails log the changes it made to the database:
At this point we have everything ready to run, so let’s check it out. Type:rails server
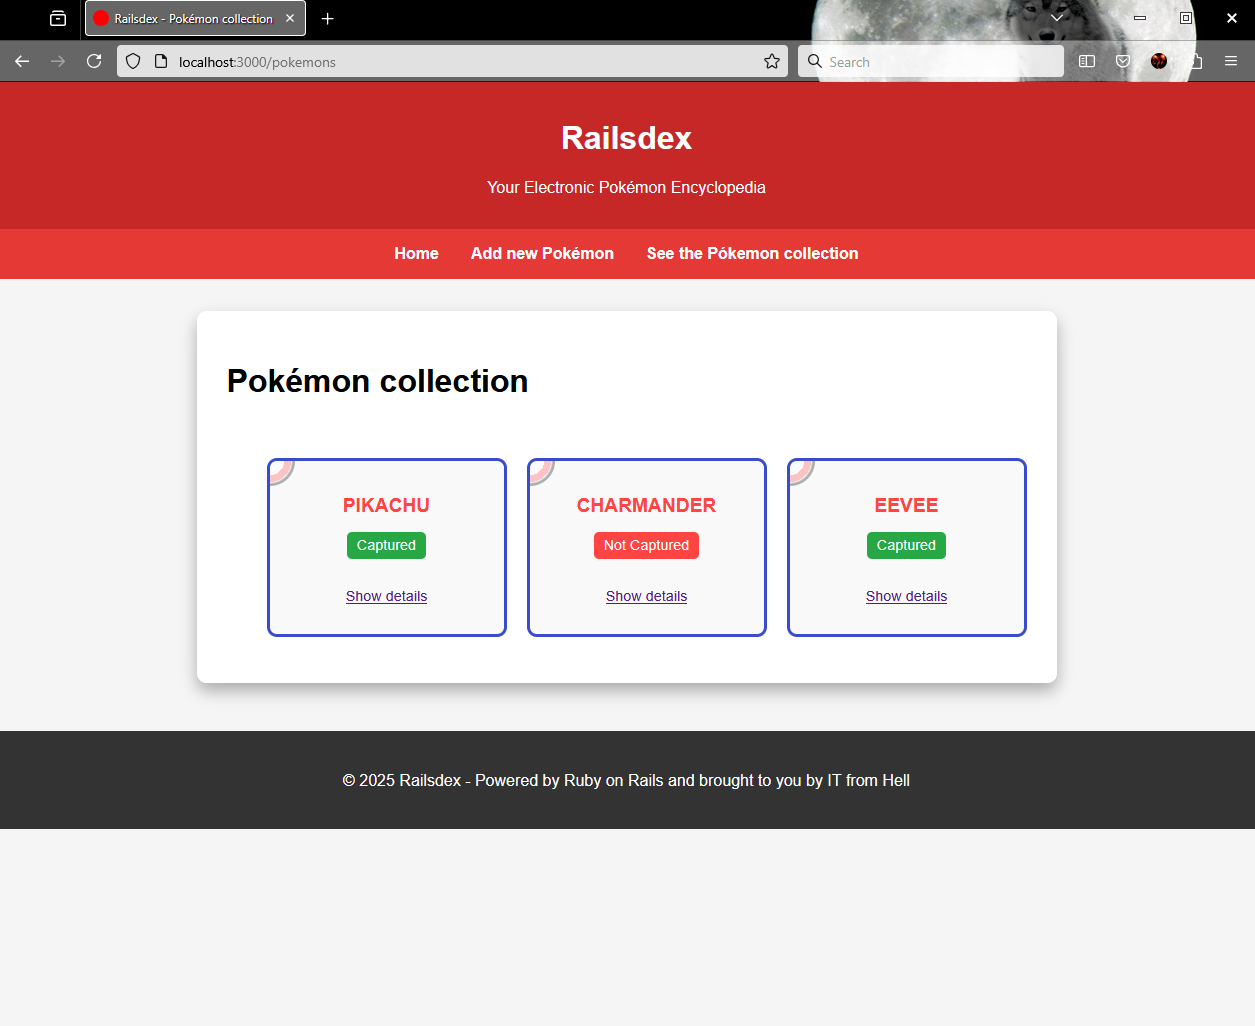
Open your web browser and navigate to http://localhost:3000/pokemons/
Look at this beauty! Take some time to explore the feature, click on New pokemon, create some data, then see the list and select one to view and update its details, remove whatever you added… just play around with your recent accomplishment.
Creating an one to many relationship
In relational databases like Oracle, Microsoft SQL, MySQL, PostrgreSQL, SQLite, etc, tables are often structured with relationships between correlated data. A brand has a car, an address belongs to a city, you got it. In a similar way, a Pokémon belongs to an Elemental Type, and we are now going to implement this one-to-many reference between Pokémons and Elemental Types.
If you are still running your application, exit Rails server pressing
CTRL+C
Database clean up/refresh
If you’ve already created data in your Railsdex app, now’s a good time to clean it up for a fresh start. Rails offers a handy command to reset its database to the initial state.
rails db:reset
This handy and powerful command recreates the database -meaning it will completely erase any existing data.
If db:reset fails -often due to file locks or permission issues- you can try the following sequence instead:
rails db:drop:_unsafe: will drop the database using brute force.rails db:create: creates a new database -following the application definition.rails db:migrate: applies all the migration files.rails db:seed: populates the database using the application seed definition.
At any time after have applied a change to the database, you can undo that running
rails db:rollback. This will rollback the last database migration.
Generate Elemental Type model
Type the following command to generate the model representing Elemental Types:rails generate model ElementalType name:string
There are more to know about
rails generate modelhere
Add a reference from Pokémon to Elemental Type
Since we’re modifying an existing model -Pokemon- we need to create a migration to apply the changes.. Use the command below:rails generate migration add_elemental_type_to_pokemon
Open the generated file /db/migrate/*_add_elemental_type_to_pokemon.rb: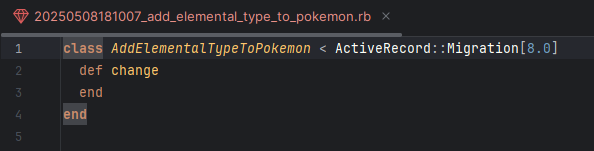
Here we need to define, using Ruby language, the change to create the relationship between both models. Add the following code between def change and end keywords:
add_reference :pokemons, :elemental_type, foreign_key: true
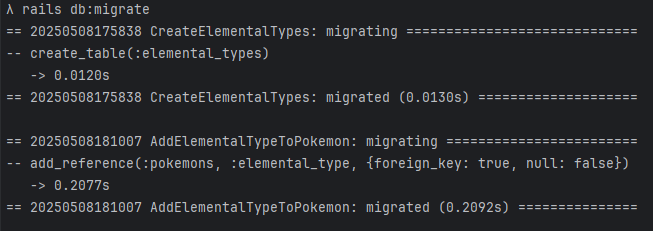
Save the migration file, and go back to the command prompt as we need to apply to database all these recent changes:rails db:migrate
In case you’re curious to know how all these change are playing together, have a look at
/db/schema.rb
A couple of small changes to go…
Edit the model file /app/models/pokemon.rb and add the following code in the class body:
belongs_to :elemental_type
Edit the model file /app/models/elemental_type.rb and add the following in the class body:
has_many :pokemons
Relationship creation is now complete. Good job so far!
A detailed guide for
rails generate migrationis available here
Implementing validations
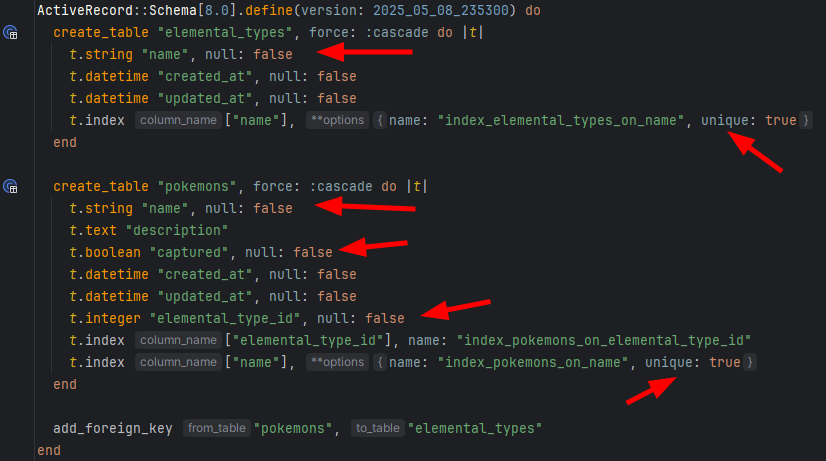
Validating data is essential when implementing an CRUD feature. Unless you (or your client) don’t care about data quality -which is unlikely, of course. We may implement the data validation in either or both application level and database level. We are implementing in both ways the validation for:
- Pokémon name is mandatory and must be unique.
- Description is optional, but cannot exceed 500 characters.
- Information about the Pokémons capture is mandatory.
- Every Pokémon must be associated with an Elemental Type.
- Elemental Type name is unique.
Database validation
A database validation is implemented using a migration file -just like any other data schema change, and written in Ruby. Execute the following command:rails generate migration add_validation_pokemon_details
Edit the migration file /db/migrate/*add_validation_pokemon_details.rb including the following code between def change and end:
# Name is mandatory
change_column_null :pokemons, :name, false
# Name is unique
add_index :pokemons, :name, unique: true
# Capture information is mandatory
change_column_null :pokemons, :captured, false
# Elemental Type is mandatory
change_column_null :pokemons, :elemental_type_id, false
Now, type the following command:rails generate migration add_validation_elemental_type_name
In a similar way, edit the file /db/migrate/*add_validation_elemental_type_name with the following piece of code:
# Name is mandatory
change_column_null :elemental_types, :name, false
# Name is unique
add_index :elemental_types, :name, unique: true
Notice I haven’t included a validation for the length of Pokémon’s description. It is because there is no way to implement such validation without using native SQL. ActiveRecord’s migration DSL does not provide a database-agnostic method to add a check constraint or similar restriction, and I wanted to keep the solution as clean and database-agnostic as possible.
With the migration files ready, we just need to apply the change:rails db:migrate
You can confirm that these validations are now part of the database by checking /db/schema.rb :
Application validation
This type of validation is implemented in each model class. Lets start by Pokémons details editing the file /app/models/pokemon.rb to add the following code above the keyword belongs_to:
# Name is mandatory and unique
validates :name, presence: true, uniqueness: true
# Description is optional but cannot exceed 500 characters
validates :description, length: { maximum: 500 }
# Capture information is mandatory
validates :captured, inclusion: { in: [true, false] }
# Elemental type is mandatory
validates :elemental_type, presence: true
And finally, the validation of the Elemental Type’s name in /app/models/elemental_type.rb:
# Name is mandatory and unique
validates :name, presence: true, uniqueness: true
Save both models to conclude the implementation.
Seeding the database
It is not uncommon that an application requires some initial data to have a specific feature working just after started for the first time. Usually, this data is related to lists of options, application parameters, initial users, etc.
In our case, Railsdex needs the list of Elemental Types from where the trainer can select what type is the freshly identified Pokémon.
Rails has ready-to-use solution in its tool-set localized in /db/seeds.rb. In this file, we can write Ruby code to populate whatever we need in the application. The data described in this file is applied to the database when it is created/recreated or when db:seed is called.
Open the file and paste the code below to populate all the 18 Elemental Types (known so far) to be available in Railsdex:
ElementalType.create!(name: "Bug")
ElementalType.create!(name: "Dark")
ElementalType.create!(name: "Dragon")
ElementalType.create!(name: "Electric")
ElementalType.create!(name: "Fairy")
ElementalType.create!(name: "Fighting")
ElementalType.create!(name: "Fire")
ElementalType.create!(name: "Flying")
ElementalType.create!(name: "Ghost")
ElementalType.create!(name: "Grass")
ElementalType.create!(name: "Ground")
ElementalType.create!(name: "Ice")
ElementalType.create!(name: "Normal")
ElementalType.create!(name: "Poison")
ElementalType.create!(name: "Psychic")
ElementalType.create!(name: "Rock")
ElementalType.create!(name: "Steel")
ElementalType.create!(name: "Water")
We seed the database executing the following command:rails db:seed
Refactoring of views and controller
Because we have added Elemental Type and made it mandatory when adding a new Pokémon, a bunch of small adaptations are need across controller and views files. Also, enhancements to styling are welcome as we evolve the application.
Instead of listing every small change (which can get a bit tedious), let’s focus on the key updates. Below is highlighted what is relevant:
- PokemonController
- Location:
/app/controllers/pokemon_controller.rb - Change 1:
- Make sure of including the list of Elemental Types in every method where the rendered page displays the data.
- Code change:
@elemental_types = ElementalType.all
- Change 2
- Add the elemental type identifier as part of expected parameters.
- Code change:
:elemental_type_id
- Location:
- View for adding Pokémon
- A selection list with all Elemental Types must be included in the form.
- Location:
/app/views/pokemons/new.html.erb - Code change:
form.collection_select :elemental_type_id,@elemental_types, :id, :name, { prompt: "" }
- View for editing details of a Pokémon
- A selection list with all Elemental Types must be included in the form.
- Location:
/app/views/pokemons/edit.html.erb - Code change:
form.collection_select :elemental_type_id,@elemental_types, :id, :name
Since now, the application is ready to use.
Yet, let’s take the chance to apply some enhancements to the look & feel and make a general code reorganization. Copy the following snippets and paste into the relate project file.
/app/assets/stylesheets/application.css
/* General application */
body {
font-family: Arial, sans-serif;
margin: 0;
padding: 0;
background-color: #f5f5f5;
}
header {
background: #c62828;
color: white;
padding: 1rem;
text-align: center;
}
nav {
display: flex;
justify-content: center;
gap: 2rem;
padding: 1rem;
background: #e53935;
}
nav a {
color: white;
text-decoration: none;
font-weight: bold;
}
main {
max-width: 1200px;
margin: 2rem auto;
padding: 0 1rem;
}
footer {
background: #333;
color: white;
text-align: center;
padding: 1.5rem;
margin-top: 3rem;
}
footer a {
color: white;
text-decoration: none;
}
footer a:visited {
color: white;
}
/* Container */
.container {
max-width: 800px;
width: 100%;
background: #ffffff;
border-radius: 10px;
box-shadow: 0 8px 16px rgba(0, 0, 0, 0.3);
padding: 30px;
position: relative;
overflow: hidden;
margin: 0 auto;
}
.container::before {
content: '';
position: absolute;
width: 150px;
height: 150px;
background: radial-gradient(circle, #ffffff 40%, #ff4444 40%, #ff4444 60%, #ffffff 60%, #000000 65%);
border-radius: 50%;
top: -75px;
right: -75px;
opacity: 0.2;
z-index: -1;
}
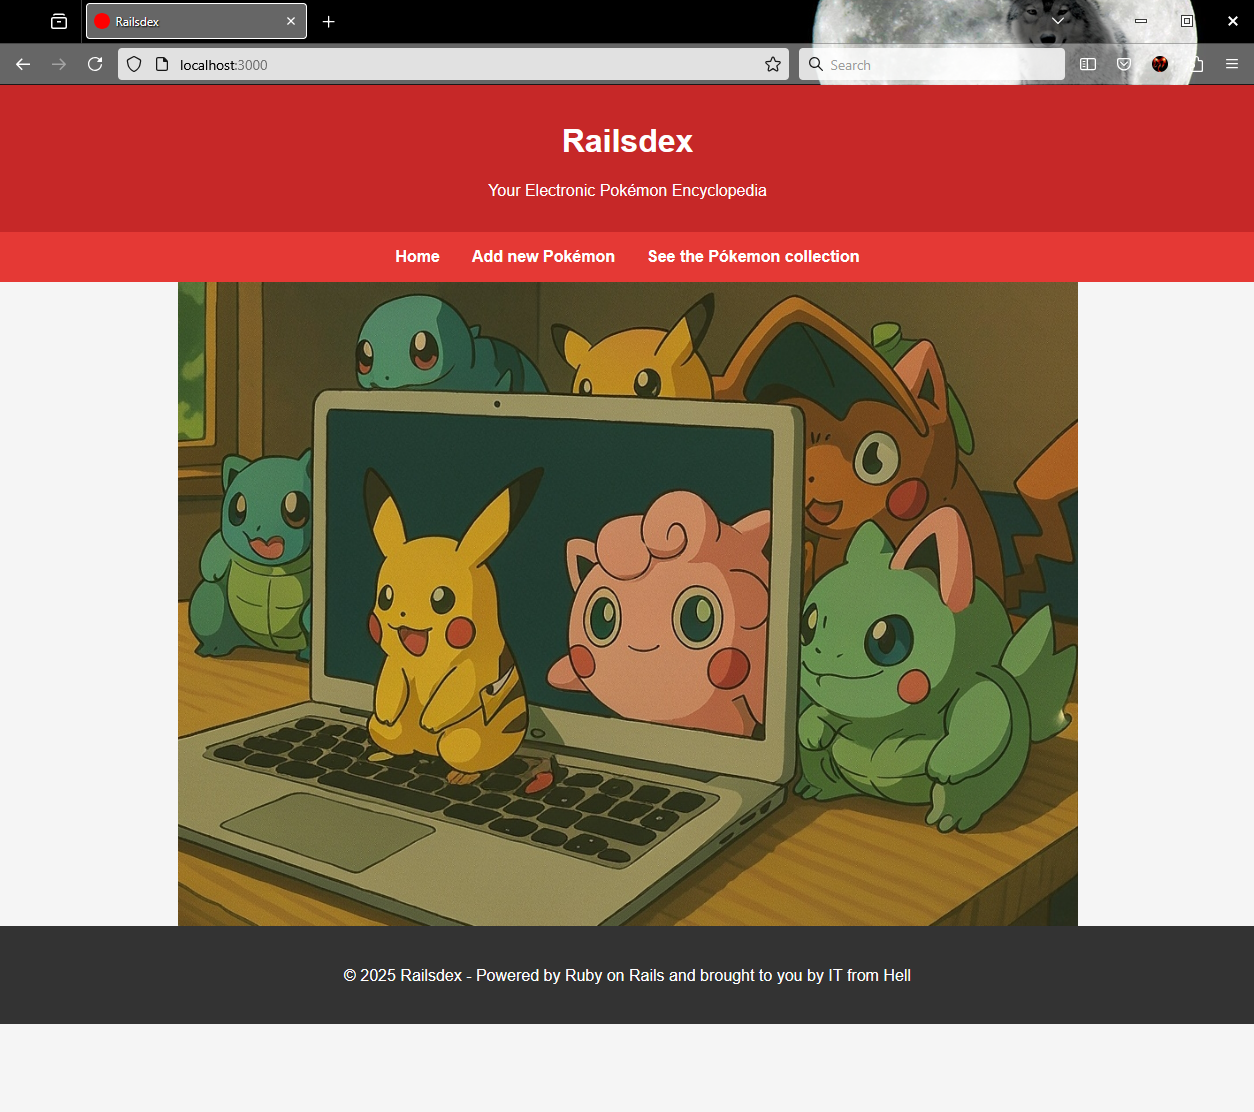
/* Homepage */
.home-background {
display: block;
margin-top: -32px;
margin-bottom: -48px;
margin-left: auto;
margin-right: auto;
width: 75%;
}
/* Form page */
.form-page {
display: flex;
flex-direction: column;
gap: 20px;
}
.form-page .back-button {
display: inline-block;
padding: 10px 20px;
font-size: 1rem;
background: #ff4444;
color: #ffffff;
text-decoration: none;
border-radius: 10px;
text-transform: uppercase;
letter-spacing: 1px;
transition: background 0.3s ease, transform 0.2s ease;
font-family: 'Press Start 2P', Arial, sans-serif;
}
.form-page .back-button:hover {
background: #3b4cca;
transform: scale(1.05);
}
.form-page .back-button:active {
transform: scale(0.95);
}
.form-group, .form-group-checkbox {
display: flex;
flex-direction: column;
gap: 10px;
margin: 10px 0 25px 0;
}
.form-group-checkbox {
display: inherit;
}
label {
font-size: 1rem;
color: #3b4cca;
text-transform: uppercase;
letter-spacing: 1px;
}
input, select, textarea {
padding: 12px;
font-size: 1rem;
border: 3px solid #8b98f2;
border-radius: 10px;
background: #f9f9f9;
transition: border-color 0.3s ease, box-shadow 0.3s ease;
font-family: Arial, sans-serif;
}
input:focus, select:focus, textarea:focus {
outline: none;
border-color: #ffcb05;
box-shadow: 0 0 8px rgba(255, 203, 5, 0.5);
}
textarea {
resize: vertical;
min-height: 100px;
}
button, input[type="submit"] {
padding: 10px 20px;
font-size: 1rem;
background: #ff4444;
color: #ffffff;
border: none;
border-radius: 10px;
cursor: pointer;
text-transform: uppercase;
letter-spacing: 1px;
transition: background 0.3s ease, transform 0.2s ease;
font-family: 'Press Start 2P', Arial, sans-serif;
}
button:hover, input[type="submit"]:hover {
background: #3b4cca;
transform: scale(1.05);
}
button:active, input[type="submit"]:active {
transform: scale(0.95);
}
.captured-status {
display: inline-block;
font-size: 0.8rem;
padding: 5px 10px;
border-radius: 5px;
margin-top: 5px;
font-family: Arial, sans-serif;
z-index: 1;
position: relative;
}
.captured-status.captured {
background: #28a745;
color: #ffffff;
}
.captured-status.not-captured {
background: #ff4444;
color: #ffffff;
}
/* Errors styling */
.errors {
background: #ffe6e6;
border: 3px solid #ff4444;
border-radius: 10px;
padding: 15px;
margin-bottom: 20px;
position: relative;
overflow: hidden;
}
.errors::before {
content: '';
position: absolute;
width: 50px;
height: 50px;
background: radial-gradient(circle, #ffffff 40%, #ff4444 40%, #ff4444 60%, #ffffff 60%, #000000 65%);
border-radius: 50%;
top: -25px;
left: -25px;
opacity: 0.3;
z-index: 0;
}
.errors h2 {
font-size: 1.2rem;
color: #ff4444;
text-transform: uppercase;
margin-bottom: 10px;
text-shadow: 1px 1px #c44a4a;
font-family: 'Press Start 2P', Arial, sans-serif;
z-index: 1;
position: relative;
}
.errors ul {
list-style: none;
padding: 0;
z-index: 1;
position: relative;
}
.errors li {
font-size: 0.9rem;
color: #2c2c2c;
font-family: Arial, sans-serif;
padding: 5px 0;
position: relative;
padding-left: 20px;
}
/* Page list */
.list-page {
display: flex;
flex-direction: column;
gap: 20px;
}
.pokemon-list {
list-style: none;
display: grid;
grid-template-columns: repeat(auto-fit, minmax(200px, 1fr));
gap: 20px;
}
.pokemon-item {
background: #f9f9f9;
border: 3px solid #3b4cca;
border-radius: 10px;
padding: 15px;
text-align: center;
transition: transform 0.3s ease, box-shadow 0.3s ease;
position: relative;
overflow: hidden;
}
.pokemon-item:hover {
transform: translateY(-5px);
box-shadow: 0 8px 16px rgba(0, 0, 0, 0.2);
}
.pokemon-item::before {
content: '';
position: absolute;
width: 50px;
height: 50px;
background: radial-gradient(circle, #ffffff 40%, #ff4444 40%, #ff4444 60%, #ffffff 60%, #000000 65%);
border-radius: 50%;
top: -25px;
left: -25px;
opacity: 0.3;
z-index: 0;
}
.pokemon-item img {
width: 100px;
height: 100px;
object-fit: contain;
margin-bottom: 10px;
z-index: 1;
position: relative;
}
.pokemon-item h3 {
font-size: 1.2rem;
color: #ff4444;
text-transform: uppercase;
margin-bottom: 10px;
z-index: 1;
position: relative;
}
.pokemon-item p {
font-size: 0.9rem;
color: #2c2c2c;
font-family: Arial, sans-serif;
z-index: 1;
position: relative;
}
/* Details page */
.details-page {
display: flex;
flex-direction: column;
align-items: center;
gap: 20px;
}
.details-page img {
width: 150px;
height: 150px;
object-fit: contain;
border: 3px solid #3b4cca;
border-radius: 10px;
background: #f9f9f9;
padding: 10px;
}
.details-page h2 {
font-size: 1.8rem;
color: #ff4444;
text-transform: uppercase;
letter-spacing: 1px;
text-shadow: 1px 1px #3b4cca;
}
.details-page p {
font-size: 1rem;
color: #2c2c2c;
font-family: Arial, sans-serif;
max-width: 600px;
}
.details-page .type {
font-weight: bold;
color: #8b98f2;
text-transform: capitalize;
}
.details-page .description {
background: #f9f9f9;
border: 3px solid #8b98f2;
border-radius: 10px;
padding: 15px;
width: 100%;
max-width: 600px;
margin-top: -25px;
}
.details-page .back-button {
display: inline-block;
padding: 10px 20px;
font-size: 1rem;
background: #ff4444;
color: #ffffff;
text-decoration: none;
border-radius: 10px;
text-transform: uppercase;
letter-spacing: 1px;
transition: background 0.3s ease, transform 0.2s ease;
font-family: 'Press Start 2P', Arial, sans-serif;
}
.details-page .back-button:hover {
background: #3b4cca;
transform: scale(1.05);
}
.details-page .back-button:active {
transform: scale(0.95);
}
.details-page .captured-status {
font-size: 1rem;
padding: 8px 15px;
border-radius: 10px;
font-family: Arial, sans-serif;
}
.details-page .captured-status.captured {
background: #28a745; /* Green for captured */
color: #ffffff;
}
.details-page .captured-status.not-captured {
background: #ff4444; /* Red for not captured */
color: #ffffff;
}
/app/views/layouts/application.html.erb
<!DOCTYPE html>
<html>
<head>
<title><%= content_for(:title) || "Railsdex" %></title>
<meta name="viewport" content="width=device-width,initial-scale=1">
<meta name="apple-mobile-web-app-capable" content="yes">
<meta name="mobile-web-app-capable" content="yes">
<%= csrf_meta_tags %>
<%= csp_meta_tag %>
<%= yield :head %>
<%# Enable PWA manifest for installable apps (make sure to enable in config/routes.rb too!) %>
<%#= tag.link rel: "manifest", href: pwa_manifest_path(format: :json) %>
<link rel="icon" href="/icon.png" type="image/png">
<link rel="icon" href="/icon.svg" type="image/svg+xml">
<link rel="apple-touch-icon" href="/icon.png">
<%# Includes all stylesheet files in app/assets/stylesheets %>
<%= stylesheet_link_tag :app, "data-turbo-track": "reload" %>
<%= javascript_importmap_tags %>
</head>
<body>
<header>
<h1>Railsdex</h1>
<p>Your Electronic Pokémon Encyclopedia</p>
</header>
<nav>
<%= link_to "Home", root_path %>
<%= link_to "Add new Pokémon", new_pokemon_path %>
<%= link_to "See the Pókemon collection", pokemons_path %>
</nav>
<main>
<%= yield %>
</main>
<footer>
<p>© 2025 Railsdex - Powered by Ruby on Rails and brought to you by <a href="https://itfromhell.net" target="_blank">IT from Hell</a></p>
</footer>
</body>
</html>
/app/views/pokemons/index.html.erb
<% content_for :title, "Railsdex - Pokémon collection" %>

<div class="container list-page">
  <h1>Pokémon collection</h1>

  <ul class="pokemon-list">
    <% @pokemons.each do |pokemon| %>
      <li class="pokemon-item">
        <h3><%= pokemon.name %></h3>
        <p class="captured-status <%= pokemon.captured ? 'captured' : 'not-captured' %>">
          <%= pokemon.captured ? 'Captured' : 'Not Captured' %>
        </p>
        <p><%= link_to "Show details", pokemon %></p>
      </li>
    <% end %>
  </ul>
</div>
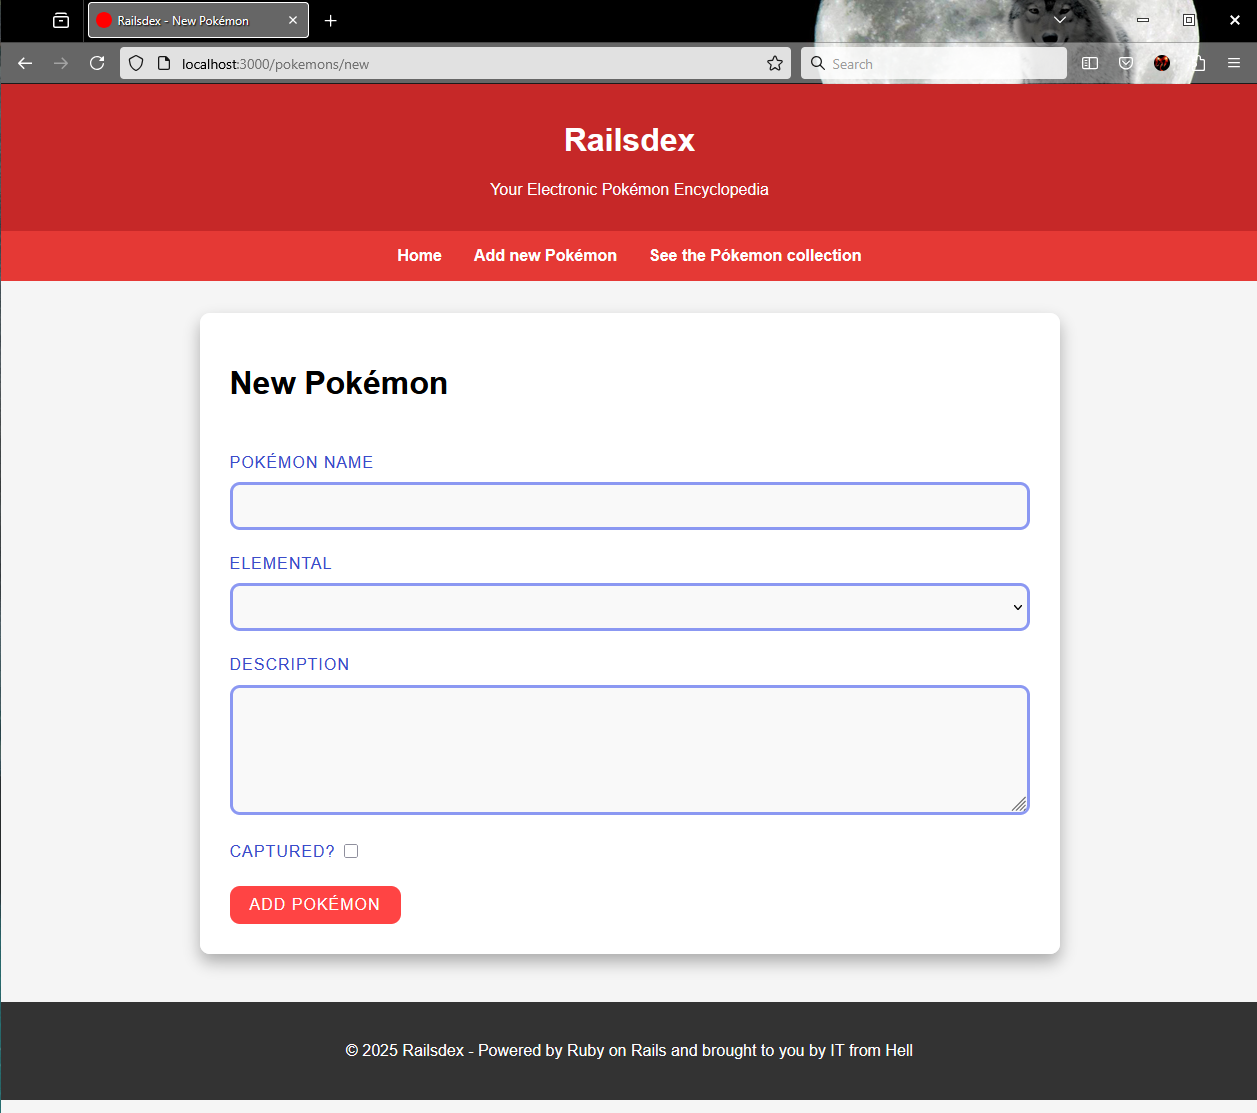
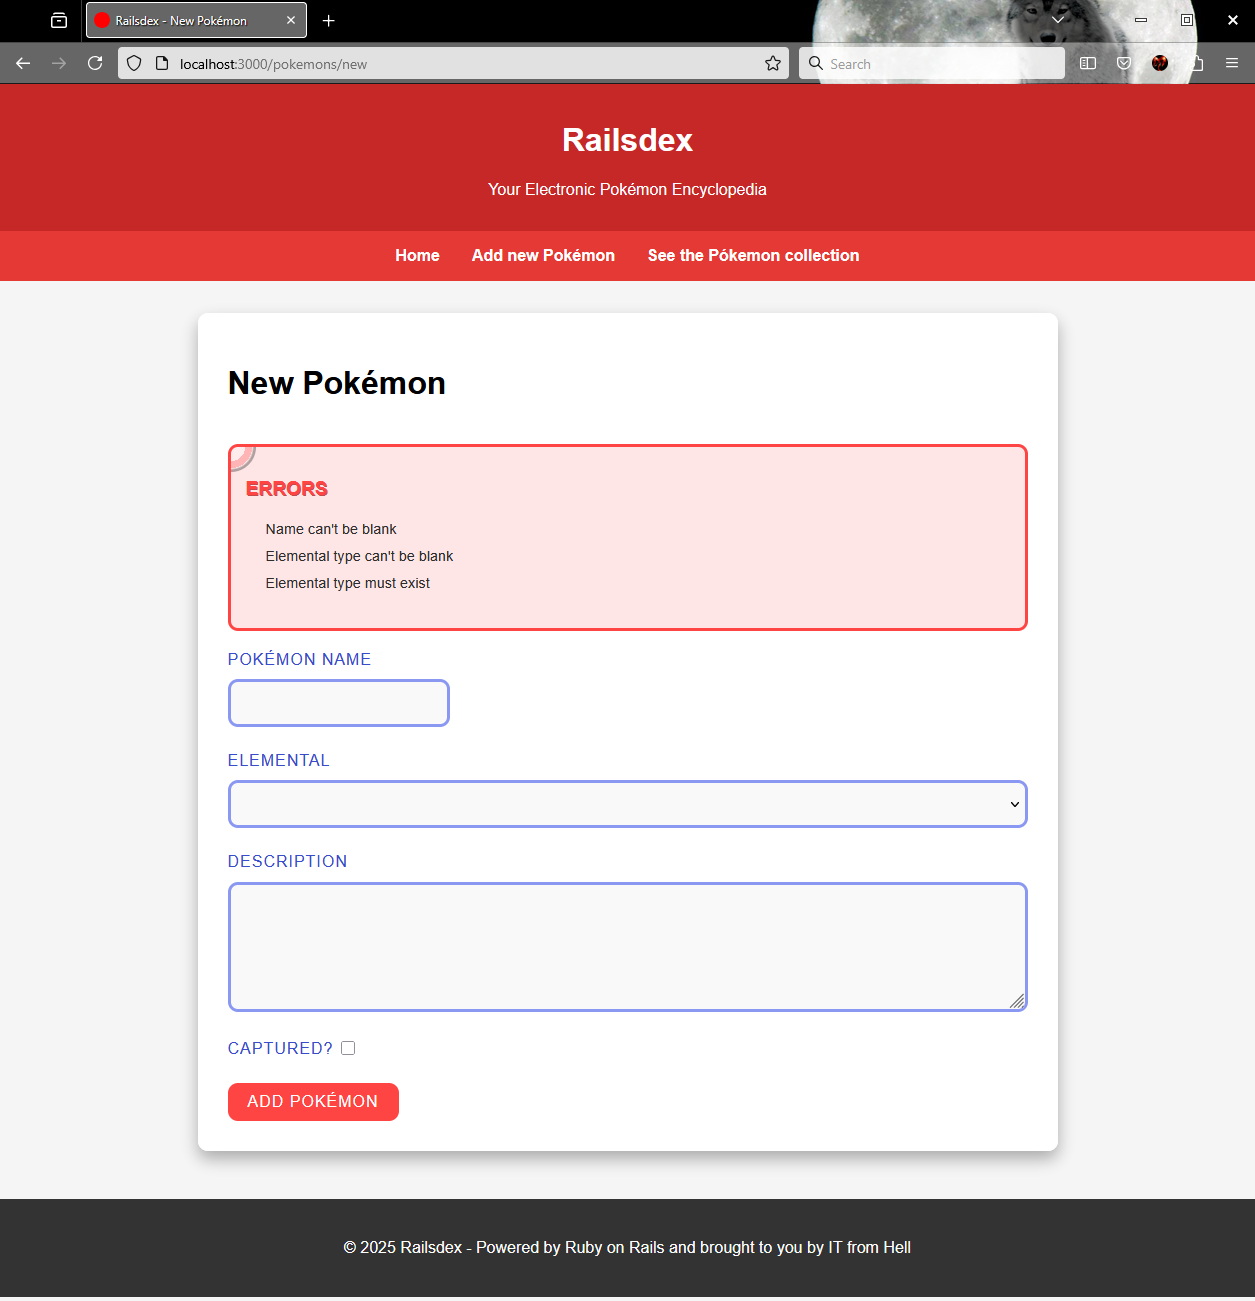
/app/views/pokemons/new.html.erb
<% content_for :title, "Railsdex - New Pokémon" %>

<div class="container form-page">
  <h1>New Pokémon</h1>

  <%= form_with model: @pokemon, local: true do |form| %>
    <% if @pokemon.errors.any? %>
      <div class="errors">
        <h2>Errors</h2>
        <ul>
          <% @pokemon.errors.full_messages.each do |message| %>
            <li><%= message %></li>
          <% end %>
        </ul>
      </div>
    <% end %>

    <div class="form-group">
      <%= form.label :name, "Pokémon Name" %>
      <%= form.text_field :name %>
    </div>
    <div class="form-group">
      <%= form.label :elemental_type_id, "Elemental" %>
      <%= form.collection_select :elemental_type_id,@elemental_types, :id, :name, { prompt: "" } %>
    </div>
    <div class="form-group">
      <%= form.label :description %>
      <%= form.text_area :description %>
    </div>
    <div class="form-group-checkbox">
      <%= form.label :captured, "Captured?" %>
      <%= form.check_box :captured %>
    </div>

    <%= form.submit "Add Pokémon" %>
  <% end %>
</div>
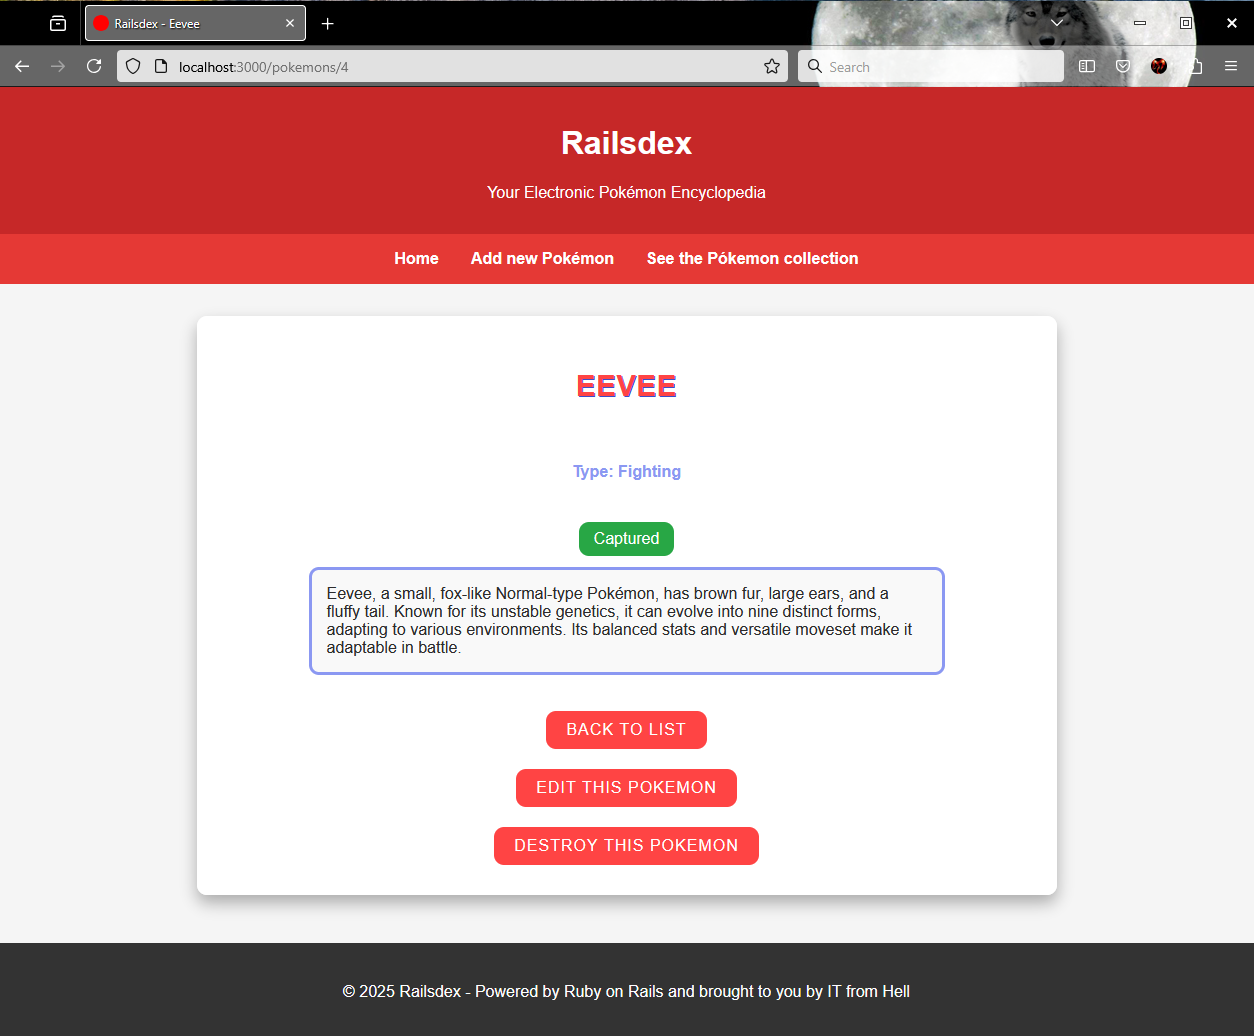
/app/views/pokemons/show.html.erb
<% content_for :title, "Railsdex - " + @pokemon.name %>

<div class="container details-page">
  <h2><%= @pokemon.name %></h2>

  <p class="type">Type: <%= @pokemon.elemental_type.name.capitalize %></p>
  <p class="captured-status <%= @pokemon.captured? ? 'captured' : 'not-captured' %>">
    <%= @pokemon.captured? ? 'Captured' : 'Not Captured' %>
  </p>
  <% if @pokemon.description? %>
    <p class="description"><%= @pokemon.description %></p>
  <% end %>

  <%= link_to "Back to List", pokemons_path, class: "back-button" %>
  <%= link_to "Edit this pokemon", edit_pokemon_path(@pokemon), class: "back-button" %>
  <%= button_to "Destroy this pokemon", @pokemon, method: :delete %>
</div>
/app/views/pokemons/edit.html.erb
<% content_for :title, "Railsdex - Editing Pokémon" %>

<div class="container form-page">
  <h1>Editing Pokémon</h1>

  <%= form_with model: @pokemon, local: true do |form| %>
    <% if @pokemon.errors.any? %>
      <div class="errors">
        <h2>Errors</h2>
        <ul>
          <% @pokemon.errors.full_messages.each do |message| %>
            <li><%= message %></li>
          <% end %>
        </ul>
      </div>
    <% end %>

    <div class="form-group">
      <%= form.label :name, "Pokémon Name" %>
      <%= form.text_field :name %>
    </div>
    <div class="form-group">
      <%= form.label :elemental_type_id, "Elemental" %>
      <%= form.collection_select :elemental_type_id,@elemental_types, :id, :name %>
    </div>
    <div class="form-group">
      <%= form.label :description %>
      <%= form.text_area :description %>
    </div>
    <div class="form-group-checkbox">
      <%= form.label :captured, "Captured?" %>
      <%= form.check_box :captured %>
    </div>

    <%= form.submit "Update Pokémon" %>
    <%= link_to "Back to details", @pokemon, class: "back-button" %>
  <% end %>
</div>
Sometimes a change in assets like images and stylesheets is not loaded by the server. In case you are not seeing such changes in the browser, exit the server and run the command
rails assets:precompile
Running the application
The so anticipated moment is now! Put the server up and go managing your collection of Pokémons in http://localhost:3000
The feeling of accomplishment is awesome!
See you in the next stop of this scarlet journey.
Knowing more about rails generate scaffold
Scaffold command generates the full set of files for a CRUD feature. You cab think of scaffold as an alias that comprehends other Rails generate commands like model, controller and migration. Instead of manually building the model, controller, and views, Rails’ scaffold does all the heavy lifting for you.
When your run the scaffold command, Rails takes care of:
- Controller including all common actions for CRUD operations.
- Model class and its database migrations defining the data structure.
- Views for create, read, update and delete the data.
- Routes to make everything working together.
All the operations taken by scaffold can be done in isolated commands like rails generate controller, and rails generate model. Or even manually creating and changing the application files.
Although scaffold is pretty handy, it is also generic. So, you may find situations where it is just better creating each component using specific commands, and even file by file.
Being scaffold a tool, it is you who will know when it is the proper to use or not.
Basic usage
rails g scaffold or rails generate scaffold
rails generate scaffold Name attribute1:type attribute2:type attribute3:type ...
Attribute types
Scroll down to knowing more about rails generate model for a datailed list of types.
Options
rails generate scaffold NameThis generates a model with no attributes.
rails generate scaffold_controller NameGenerates only views and controller, skipping the model generation and migration files.
rails destroy scaffold NameUndo all the generated components and changes done by the scaffold command.
--skipAvoid the generation of components that already exists. If your model was previously created, you may run this command to generate only controller, views, and routes without overwriting the model or migration files.
--skip-collision-checkGenerates all the necessary files even when there are existing ones. This option will eventually overwrite and exiting component without warnings. Use this option if you want to force generation despite conflicts.
Knowing more about rails generate model
Just like rails generate controller, the rails generate model command is used to generate all the configuration related to a specific model in a Rails application. This command is flexible and powerful, helping you create a model tailored to your application’s specific needs. When run, Rails automatically generates the model file, its corresponding migration file, and test files associated with the model.
Basic usage
rails g model or rails generate model
rails generate model ModelName attribute1:integer attribute2:string:index attribute3:decimal{10,2} attribute4:string{5}:uniq ...
Attribute types
- string: A short text field (typically up to 255 characters).
- text: Longer text field for larger amounts of text (e.g., descriptions, content).
- integer: A whole number (positive or negative).
- float: A number with decimal points.
- decimal: A high-precision number for financial or exact calculations.
- boolean: A true/false value.
- datetime: Stores both date and time.
- date: Stores only a date (no time).
- time: Stores only a time (no date).
- timestamp: Similar to datetime, stores date and time.
- binary: Stores binary data (e.g., files or blobs).
- references (or belongs_to): Creates a foreign key for associations (e.g., linking to another model).
- json or jsonb: Stores JSON data (structured key-value pairs).
- array: Stores an array of values (supported in databases like PostgreSQL). Requires specific database support.
- inet: Stores IP addresses (PostgreSQL-specific).
- uuid: Stores a universally unique identifier (UUID).
Attribute options
Each attribute definition can include zero or more options, depending on the attribute nature you may apply the following.
:indexAdds a database index for this attribute.
:uniqEnforces uniqueness for the attribute.
type{limits}Only valid for string and decimal types. Use curly braces {} to specify limits.
- For string, it sets a character limit.
first_name:string{20} - For decimal, it defines precision and scale.
price:decimal{10,2}
Options
--no-fixtureSkips the fixture generation.
--skip-migrationSkips the generation of the migration file.
--skip-timestampsSkips adding created_at and updated_at attributes.
--orm=ORM_NAMESpecifies a different ORM. Default used is ActiveRecord. This is useful when working with MongoDB whe you can set Mongoid.
--parent=ParentModelSpecifies a parent model for Single Table Inheritance (STI).
--primary-key-type=ATTRIBUTE_TYPESpecifies the type for the primary key instead of default integer.
Namespaces
You can generate a model within a namespace. For example, to create a Book model under a Product namespace, you can use:
rails generate model product/book --parent=Product or rails generate model Product::Book --parent=ProductThis will create a model following the Product namespace, and Rails will place the associated files accordingly.
Knowing more about rails generate migration
In a Rails application, we typically apply changes to the database structure using migration files. A migration is used to create and drop tables, add and remove columns, apply indexes and constraints, rename database objects -you get the idea.
Convention over Configuration (CoC) is a software design paradigm (oh man, I’ve been waiting ages to use that word!) that says as long as you follow certain conventions, you’re free from having to handle some configurations yourself.
Ruby on Rails embraces CoC as a core design principle, and we can see this clearly in the rails generate migration command. By following naming conventions when setting the migration name, Rails will generate the migration content for you and often without needing any manual tweaks.
Naming conventions
Any migration name that doesn’t follow a recognized convention will create an empty class, and you will need to write the custom code manually.
Create
rails generate migration CreateBook title:string author:stringThis will generate a migration file with Ruby code to create a books table (note the pluralization) and two columns: title and author.
Drop
rails generate migration DropBookThis command generates code to drop the books table.
Add
rails generate migration AddPriceToBook price:decimal{10,2}This adds a column named price to the books table, with the decimal type and a precision/scale of 10,2.
Remove
rails generate migration RemoveAuthorFromBook author:string
This removes the author column from the books table.
Basic usage
rails g migration or rails generate migration
rails generate migration MigrationName attribute1 attribute2
Options
--forceOverwrites any existing migration file with the same name.
--skipSkips generation for files that already exist.
--primary-key=COLUMN_NAMESets a custom name for the primary key column.
--primary-key-type=ATTRIBUTE_TYPESpecifies the type for the primary key (instead of the default integer).
Source code and live application
You can find the full and functional source code for this post on GitHub.
Check it out at github.com/gabrielstelmach/itfromhell/railsdex.
Curious to see Railsdex in action? Catch it live here:
railsdex.itfromhell.net

Leave a comment